How to get started?
Hello fellow Delta,
We are thrilled to have you as a part of our growing community.
You got your LeadDelta subscription, and you must be wondering, how do I make the best of it?
We are here to help you. 🙌
Collaborate with your team
You can easily add more users to your LeadDelta by choosing our Business plan. It's ideal for teams focused on collaborative sales, hiring, fundraising, and marketing.

Sign Up, Sign In, App, Extension
Sign Up
In order to Sign Up for LeadDelta, use this link.
Simply enter your information- First and Last Name, email address, and generate the password.
You can also Sign up with your Google account with a simple click.
Sign In
In order to Sign In to your LeadDelta account, use this link.
Enter the credentials you’ve used to sign up for the account.
LeadDelta App
LeadDelta is a standalone web app that can be used in any browser. It is also available in the mobile view, where you can access all the app features except Inbox.
Extension
LeadDelta can also be used as a Chrome Web Store Application (Extension or Plug-in) and it can be used on any Chromium-based browser.
Once it’s added, pinning the extension would be a smart move- that way you can easily access your LeadDelta account.
.png?width=500&height=292&name=LeadDelta%20Onboarding%20Manual.docx%20(1).png)
Sync
The first time you access your LeadDelta account, you need to initiate the sync by giving LeadDelta permission to sync with your LinkedIn account.
At that point, you will notice that something is happening in the background, and we will get the latest set of your connections. This process might take up to 5 minutes. Hang in there ⌛
LeadDelta will also be doing auto-sync every time you are online and when more than 12 hours have passed since the last sync was done.
Update
Now that your connections are synced, the system will start updating them automatically, over a certain timeframe.
Depending on the number of connections, this process might take a few days.
You can also manually update your connections.
Click on your profile picture inside your LeadDelta account and go to Settings to customize how many connections are updated daily.
.png?width=600&height=212&name=Screenshot%20(17).png)
Make sure to comply with LinkedIn rules, and keep manual updates within the safe limits.
LinkedIn has different profile view limits depending on your subscription.
- If you are a free user, you don’t put more than 50 updates per day.
- If you are a Premium user, you can update up to 150 profiles per day
- If you are using Recruiter or Sales Navigator, you can update up to 300 profiles per day.
- Please count on your personal visits and searches.
Dashboard
Dashboard gives a clear overview and lets you choose the proper focus and work on your network more efficiently.
No overload of information or unnecessarily complicated reports.

Connections - The number of your contacts in LeadDelta.
Followers - The number of people who follow you on LinkedIn.
Followings - The number of profiles you follow, including pending LinkedIn requests, pages, and newsletters.
Number of Tags - The number of tags created in LeadDelta, available on the Tags Tab.
Untagged Connections - This number gives you a filtered view of untagged connections, which can signal you to people you might have missed.
Messaged Connections - The number of conversations you have with your connections.
Users with Notes - The number of connections with notes. It gives you an insight into how proactively you keep data about your connections.
Most Popular Countries - a simple pie chart with a progress bar with the percentage of each country of your connections.
Most Popular Jobs - Progress bar with percentages of your connections with the most popular jobs listed.
Most Popular Industries - Progress bar with percentages of your connections with the most industries listed.
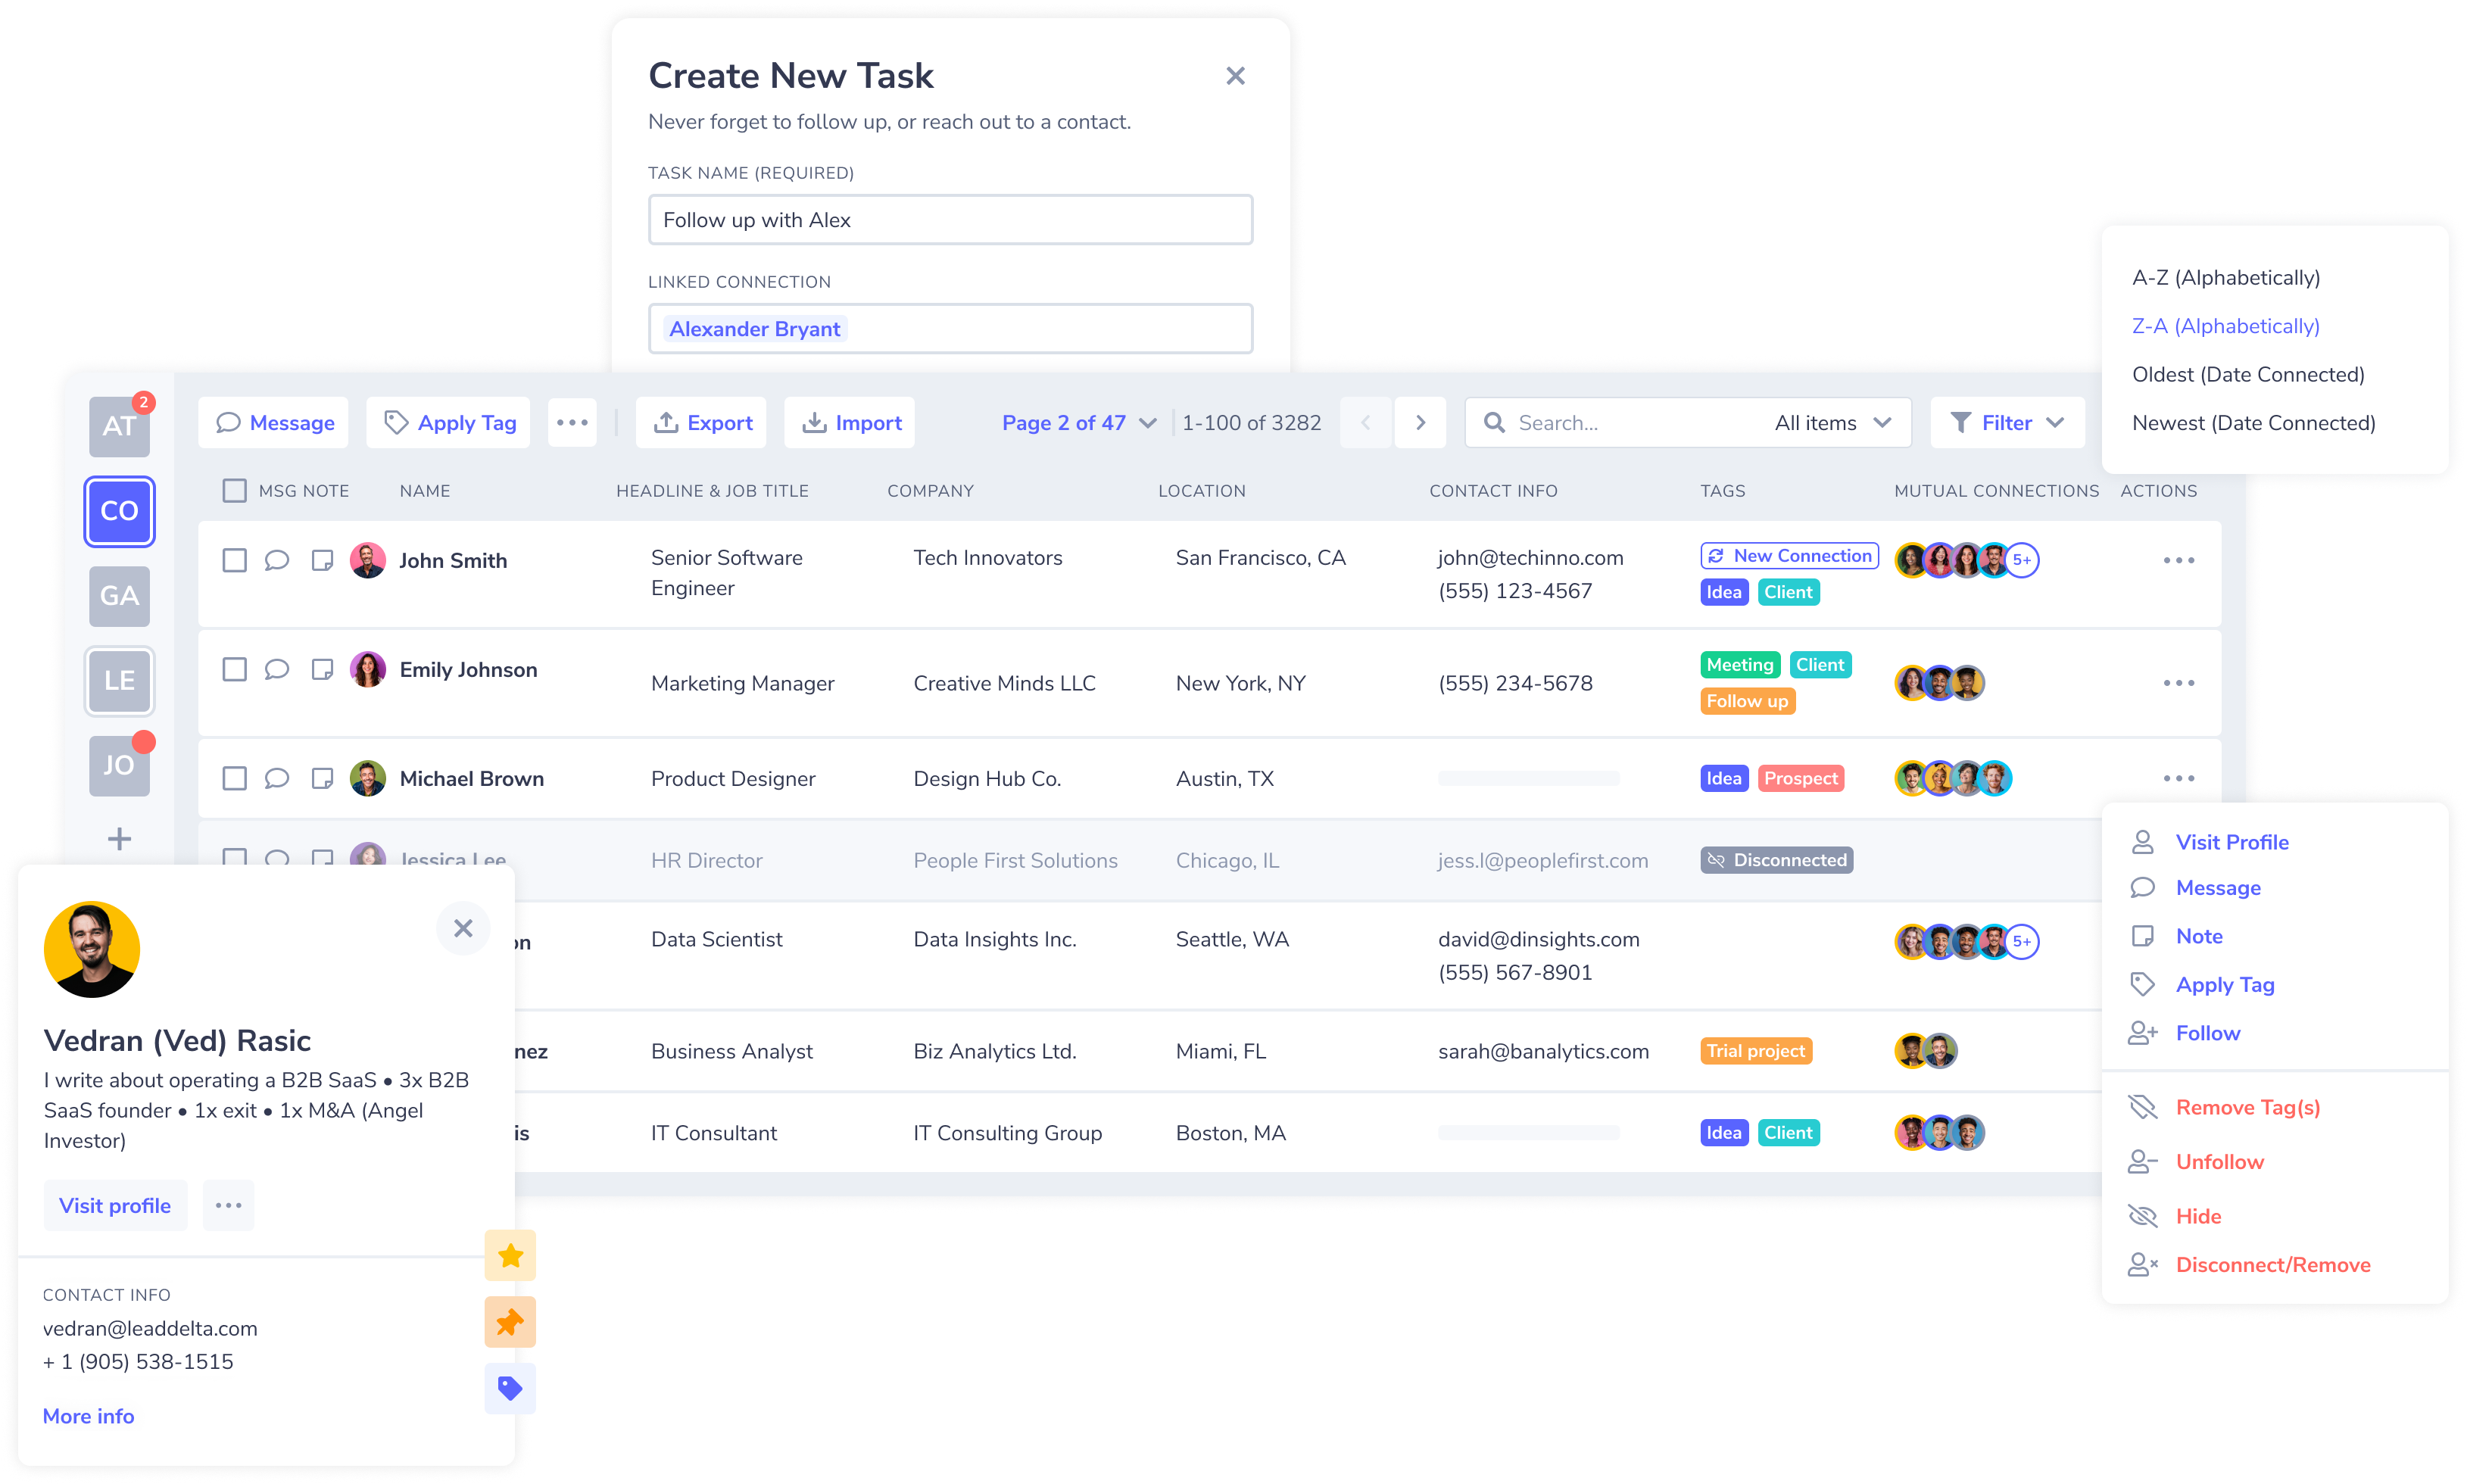
Connections
Connection Overview
Connection Tab gives you an overview of your network, as well as mutual connections you have with your team.
Customize your Connections tab:
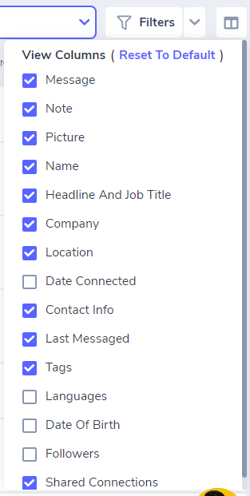
Decide which columns you want to have presented on the page. In case you don’t wish to see certain columns, or you need to see all of them, you can easily manage your overview.
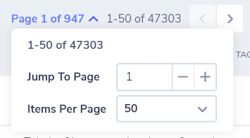
Pagination and Sorting:
All your connections are sorted by the connection date and you can see 50 connections per page by default. However, you can easily change this depending on your needs.
Changing the number of connections per page (pagination) can be especially useful if you want to message your connections in bulk.
When it comes to sorting your table view, you can do it by clicking on the column names. You can sort your table based on: Name, Company, Location, and Contact Info.
Search for a connection:
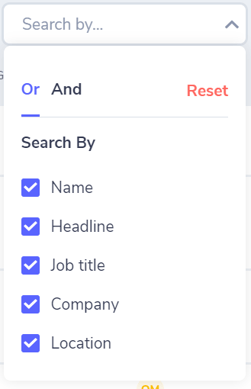
You can search your connections by Name, Headline, Job Title, Company and Location. Please keep in mind that, for now, the search is based on the keyword, so all connections that contain a certain term will be presented on the page.
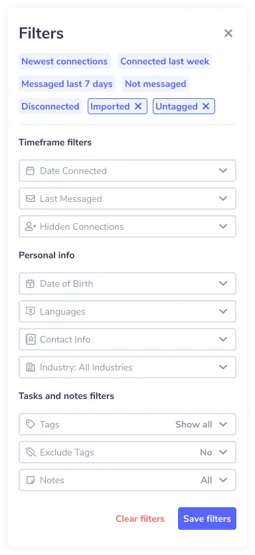
Filter:
Finding the right connection(s) is super easy with LeadDelta’s filters. LeadDelta currently offers 15+ different filters and more to come.
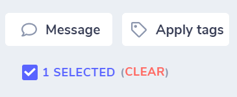
Select Connection(s)/ Unselect connection(s):
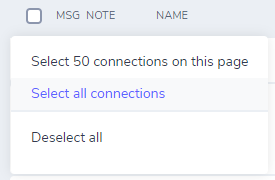
To perform any of the bulk actions, you need to select a connection(s) first. It can be done before or after the filters are applied depending on the desired outcome. Before you run another query, make sure to unselect previously selected connections.
Once you select desired connections, you can:
Export connections:
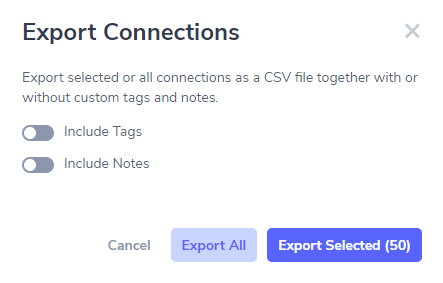
Export a .CSV file with all relevant data. At that point, you can choose whether you want to have tags and/or notes presented in the file.
Apply Tag:
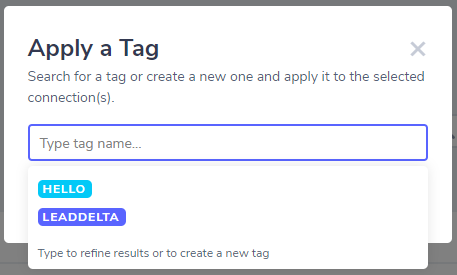
Tag single or multiple connections. Once you click on the Apply Tag button, you can choose one of the tags you’ve already created or type in the name for the new tag creation.
Remove Tag:

Remove the tag from single or multiple connections by clicking on three dots, the remove tag button, and searching for the tag you want to remove.
Message connection:
Send a message to single or multiple connections in bulk. Please keep in mind that, to keep your LinkedIn account safe and to prevent restrictions, there is a limit for bulk message action, and it is set to 25 connections at once.
Tip: Changing the pagination on the page will make this process easier.
Best-case practices:
If you are already sending the maximum amount of personalized messages at scale per day to your connections
- do personalize it with the first name;
- do not overdo it. Especially if you don’t usually send more than a few messages a day;
- do not include an URL if you are sending to more than 5 connections. Instead, ask a question “Would you like to ___?”
- LinkedIn doesn’t like when you send the same URL that sends users off of LinkedIn.
Add a Note:
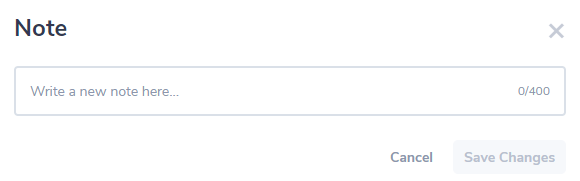
Keep your connections organized by adding a note to connections. Once added, the note can be edited or deleted.
Hide/ Unhide connection:
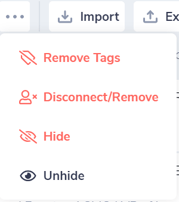
Keep your connections list clean by hiding single or multiple connections from your home page. Hide action can be reverted at any point. Even if you hide someone from the home page, you can still find those connections by using filters.
Follow/ Unfollow:

By connecting with someone on LinkedIn, you’re following them by default.
When you follow someone, new content posted or shared by the person will be displayed in your feed.
If you no longer wish to see their content, you can always unfollow that person. If you change your mind later on, you can find those connections using filters and revert the action.
Please keep in mind that following/ unfollowing too many connections in a short period of time can lead to bad consequences, such as LinkedIn restriction.
Disconnect/ Remove connection:
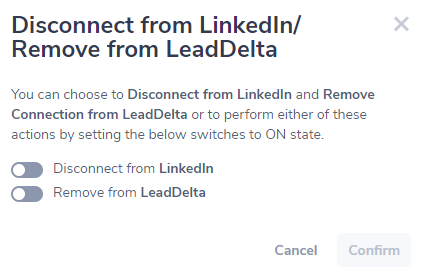
Going through your connections you’ll soon realize that you don’t want/ need to be connected with someone anymore. At that point, you can disconnect single or multiple connections by clicking on the disconnect/ remove button. The disconnect option will remove the connection from your LinkedIn account, at that point, you will see the disconnected tag next to the connection.
The remove option will remove the connection from your LeadDelta account only. You can use both options if you want to permanently remove the connection.
Please keep in mind that disconnecting from too many connections in a short time can lead to bad consequences, such as LinkedIn restriction.
On LeadDelta trial, you can disconnect 25 connections to see how it works. By using paid plans you can do unlimited batches of 25.
The number of connections you should disconnect will depend on your current LinkedIn usage. However, since the limit for bulk removal is set to 25, for your own safety, we don't recommend removing more than 50 connections per day.
Visit a profile:
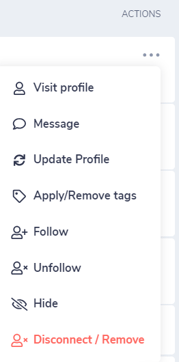
If you wish to visit someone’s profile, you can easily navigate to the three dots menu and find the visit profile button. Please keep in mind that visiting too many profiles in a short time can lead to bad consequences, such as LinkedIn restrictions.
Inbox

Many of our users wanted to have an easy way to work on nurturing their connections and being able to see prior communication is one of the key elements.
Having to navigate between LeadDelta and LinkedIn Inbox can be a challenging task. They needed a place where they could see and read all prior conversations, reply when needed and keep the conversations organized (pinned, starred, tagged, archived, etc).
So we brought your LinkedIn Inbox to LeadDelta. Think about this as the central hub for your LinkedIn messages.
You can find it in the top navigation bar.
Find out more about the technical aspects of the Inbox section here.
Sparkle AI
LeadDelta understands that a successful communication tool should seamlessly integrate into your existing workflow. With this in mind, Sparkle AI feature came to light.
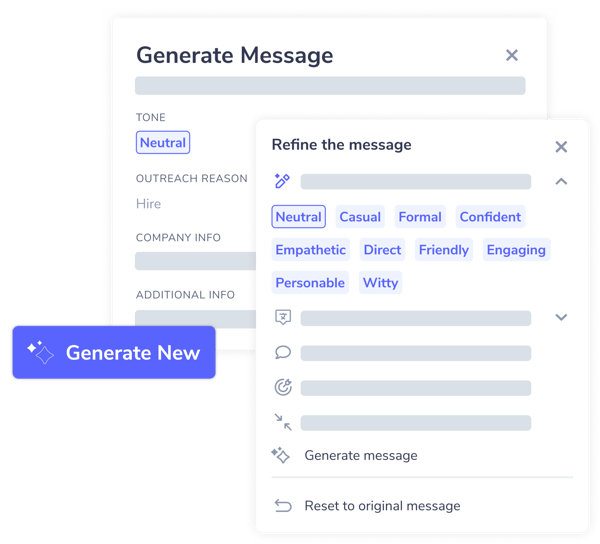
This feature empowers users to go beyond generic messaging, enabling them to create thoughtful, context-aware messages that significantly enhance the effectiveness of their LinkedIn outreach efforts.
SparkleAI feature is available in the LeadDelta Inbox, Templates, and while writing a message within LinkedIn directly.
Sidebar
Having all the information at a glance while working on a specific set of connections or connections is vital for managing relationships. That's why we introduced Sidebar, your window into connections.

There are three different Sidebars: Connection, Inbox, and LinkedIn Sidebars.
Connection Sidebar is located in the main connections tab and can be opened on the right when clicking on a specific connection.
Inbox Sidebar - Directly in the Inbox, click on the two arrows while in the chat, and the sidebar will open on the right, giving you all the info at once.

LinkedIn Sidebar - will give you an option to easily add 2nd and 3rd-degree connections to your LeadDelta dashboard while browsing company pages or people profiles.
These connections can be added to LeadDelta by clicking on the + button next to the connection you want to add.
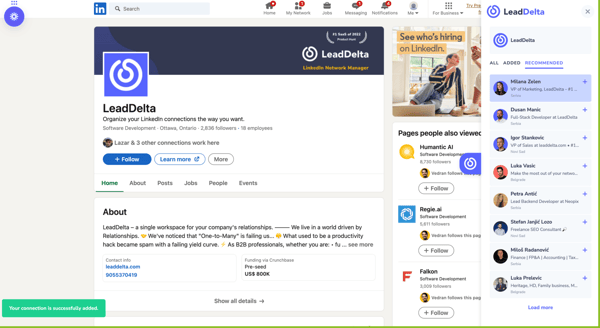
These connections will get the “imported” auto-tag inside LeadDelta to easily differentiate and identify them later.
Tags
What is the better way to speed up your workflow and manage your connections more effortlessly than labeling them?
Tag is a label that you can apply to your connections for identification, better organization and categorization, and for improving the efficiency of your sales and marketing process.
With Tags you can:
- Segment connections or create groups of connections, for example, “Attended Conference” or “Ebook Lead”
- Keep track of communication with connections. You can add a tag, for example, “Don’t contact again” or “Get in touch in a month"
- Create a list of connections split into groups so that you can keep track of who is receiving what message - "Contacted", "Rejected", "Interested".
- Focus on the meaningful relationship with your connections by labeling the ones you care about - "Urgent", "High-priority"
- Manage your connections using filters and search your contacts by tags.
Tags can be customized as much as you want based on the information you have about each connection and your use case.
Navigate to the Tags tab in the top navigation bar:
Add New Tag- Highlight each tag in a different color, or create a different coloring scheme with hex codes.
Manage Tags- At any point edit or delete the tags you’ve created.
Auto-Tags - Every connection that gets added to LeadDelta system will be automatically labeled by the system depending on the source of the connection. This will help you keep your connections organized before you’re ready to apply the appropriate tag.

In the Tab menu, you can view a complete list of tags that you’ve created and the number of connections each tag is applied to.
Once you’ve added tags to connections, you can filter them out by one or more tags to list only the contacts tagged with the selected tags.
Tasks
The Tasks and Reminders feature is a robust tool created to enhance your organizational skills, assist in task list management, and ensure you never miss significant dates or appointments.

This guide is here to provide you with a step-by-step walkthrough on maximizing the potential of this feature.
Templates
The hardest part about building a relationship with your connections is sending them a message.
Do you like spending time writing very similar messages over and over again? Most people would say no to that question, and that’s why Templates are so important. Not only that you can save the converting message to keep refining and improving it over time, but not having to repeatedly type out the same message is a huge time and productivity saver.
A template is essentially a prewritten message that you can use to communicate with your connections easily. Depending on the receiver, you can personalize each template, and the end goal is to keep working on the verbiage until your messages stand out and keep bringing conversations.

Add New Template- Create your message and use the dynamic fields (First, Last Name, Company) to personalize the message.
Manage Templates- At any point, delete or edit the templates you’ve created.
Default Templates- The list of templates written by LeadDelta experts for the most common outreach. Those templates can’t be deleted.
Integrations
In today’s world with all the different tools and apps you’re using, it’s hard to keep everything organized and streamline your workflow. If you’re aiming to work smarter not harder, it’s essential to employ different automation and create an easy way for your tech-stack to communicate in both directions.
The starting point for each integration is to generate the API key.
The API key allows you to connect LeadDelta with another tool you are using in a very direct way. The API key often constitutes both a unique identifier and a unique token for the authentication.
Currently, you can integrate your LeadDelta account with another one using:
(Check out the best ways to use LeadDelta + Zapier integrations)
2. Native Hubspot integration.
(If you're wondering which use cases you can cover with the integration, this article will help you understand how to set this up to match your current workflow.)
CSV Import
LeadDelta understands the challenges professionals face in managing their digital networks. With the new .CSV Import feature, LeadDelta is providing an all-in-one solution that empowers you to unify and take control of your network.
.svg)
The process is simple and efficient:
- Export your contacts from various platforms in .CSV format.
- Upload the .CSV file to LeadDelta.
- Your contacts will be automatically organized with the auto-tag and displayed on the Connections page.
.png)
Vedran Rasic- Founder
Ved is our Chief Delta passionate about growth, people, and products. Ved is in charge of all sales/billing inquiries and can be easily reached at ved@leaddelta.com.
%20(1).png)
Ellen (the) Fox- Customer Experience
Ellen is not a bot, au contraire, but she loves to build a mystery around her. She is our know-it-all, passionate about customer experience, success, and growth. Ellen is in charge of CX and can be easily reached at support@leaddelta.com or via live chat inside the extension.